 |
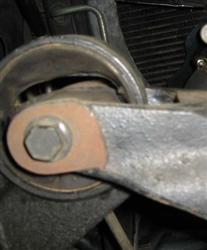
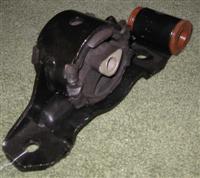
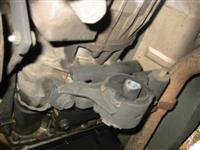
Before we get started, this is what a bad mount looks
like. It may still look solid but it has both sunk and become
hard.
|
 |
Tools:
Since Jeep is the only place to get these things your going to
need to order some parts. I got mine from www.chryslerpartsdirect.com.
(Also known as Franklin Sussex Auto Mall, in Sussex, New Jersey,
1-888-528-2200) They are a dealership but don't charge you like
they are.
|
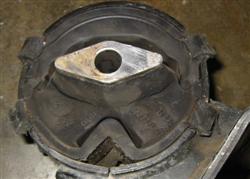
Before we get started, this is what a bad mount looks
like. It may still look solid but it has both sunk and become
hard.
|
|
| Parts * | DC Part
Number |
CPD |
Local
Dealer |
|
| Passenger side mount | 52058502 |  |
$60.35 |
$78.95 |
| Driver side mount | 52059503-AB |  |
$59.90 |
$75.95 |
| Transmission
mount and exhaust hanger |
52058608 |
 |
$44.00 |
$60.95 |
* You should replace all three at the same time. That ensures
your engine will be properly located and all drive angles will be back
to stock. I found this out after doing the motor mounts and had
to swallow the local dealer price for the tranny mount.
DON'T DO THAT. mkay? :)
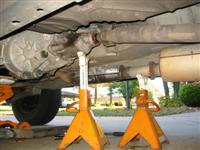
| Passenger side mount: (easiest of the three to do) | |
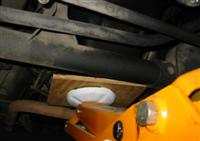
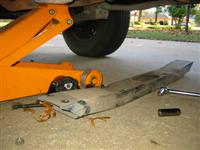
| 1)) support the engine from the oil pan
using
a piece
of plywood to spread the load. Tighten the jack against the pan but DO NOT jack the vehicle off the ground. You just want it snug so nothing moves. 2) Loosen the body bolts and the center bolt 3) remove the nut from the center bolt and jack the engine up till the bolt slides free. (don't jack too far or it won't come out either) 4) remove the remaining four body bolts and the old engine mount 5) insert new engine mount and torque the body bolts to 40 ft.lbs 6) Put the center bolt back in and put the nut on it but don't torque it down yet. |
 |
| Driver side mount: | |
| 7) Remove the air cleaner intake and box because
it's going to be in your way. :) |
 |
| 8) Remove the heat shield protecting the steering column. This is a fragile thing so you might need couple of washers to fasten it back on. Clean it, a black heat shield isn't too effective. You need to remove this to get at the steering colum later. | 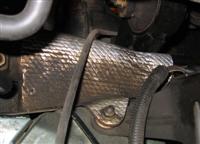 |
| 9) Remove the "anti collapse" plastic clip You will replace this and secure it with that ziptie. It keeps the steering colum from collapsing under normal operation and is CRITICAL to replace. Got that. Fail to put this part back and your steering colum can collapse leaving you WITHOUT STEERING. That would be "a bad thing." If you don't have one you missed a critical recall. Contact your dealer for the part. Mark the steering column and steering box at the pinch clamp and remove the pinch clamp bolt (all the way out) If you don't take the bolt all the way out you will not be able to remove the column. |
 |
| 10)
Collapse the shaft slightly and set the shaft
aside (toward the
engine) and get the
top two bolts. This is where a couple of long extensions work
well.
You can reach the back bolt by squeezing between the ABS pump and
intake manifold. The lower two are a bit of a pain but can be
gotten
at without having to get under the vehicle. As can the through
bolt.and slide the steering column up and move
to the side. |
 |
| 11) Loosen the
body bolts and center bolt 12) remove the center bolt nut and jack the engine up till the bolt will slide out. 13) using the long extensions (you will get it) remove the top body bolts. The bottom body bolts are somewhat hidden and take a bit of reaching but can be done from the top by reaching under the mount. 14) Jack the engine up a bit more till you can rotate the mount down and out. Then slide the new mount in and loosely fit the body bolts to hold the mount in place. 15) lower the engine a bit (or the holes won't line up) and slide the main bolt in. 16) Torque the body bolts to 40 ft.lbs 17) Slowly let the engine fully down 18) Torque both center nuts/bolts to 48 ft.lbs 19) reinstall steering column and clip, put locktite on the shaft retaining bolt and torque to 33 ft.lbs. 20) Reinstall heat shield and air box |
| Transmission Mount: | |
|
This time your going to have to put some jack stands under the xfr case and exhaust pipe since the hanger is going to be removed (and it's safer) 2) Remove the through bolt. You don't need to mess with the lower mouting bolts. |
 |
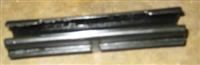
| 3) The book will tell you to
jack the tranny up to remove the lower plate. This won't work as
there isn't enough room to move the tranny up and get that plate
out. Besides which it is going to get in the way when you
go after the tranny mount. So, just drop the cross brace. There will be two slots on one end (drivers side) and two bolt holes on the passenger side. Just loosen the slotted side so you can slide it back in later. |
 |
| 4) Remove the bolts holding the
mount to the tranny. These will be a pain
in the ass and require a bit of PB blaster and a breaker bar (possibly
with cheater) or an impact wrench. I twisted my 1/2"-3/8" adapter. 5) wiggle the old mount off the exhaust hanger and with a few drops of oil, slide the new one on. A bit of antisieze on the bolts will make the next time you do this eaiser. Tranny mount bolts go to 34 ft.lbs. Torque them down now when they are easy to get at. 6) Now slide the cross brace up. You will have some problems getting it to fit because the engine will have slid back under its weight. It may feel like your trying to force the fan into the radiator but that's normal. If things get impossible you might have to remove the lower support bracket from the cross brace. This gives you a bit more slop to get things lined up. The lower bracket stud nuts go to 30 ft.lbs. The cross brace bolts go to 30 ft.lbs. 7) Torque the mount nut to 48 ft.lbs |
 |
|
--DougW-- |
 |